Monday 29 April 2013

Rudders and Finns


At least the weather has been half decent this weekend which has allowed me to scratch the surface of the project. However I have also had to score some brownie points by doing some decorating and mowing the lawn - which had suddenly grown by about six inches. As all in the UK will know, spring is at least a month late this year and all the plant activity seems to be being concentrated. The picture in the last post showed a Japanese Magnolia and already the petals are turning brown and falling off. Here is a cherry tree taken three days ago and most of the blossom is gone already.
Beautiful but short lived
Most importantly I managed to clear most of the rust off the centreboard and was delighted to see that while there was a lot of corrosion there is still enough good steel. So a bit of rust treatment and suitably tough paint and I should have a board that will last at least a few years. I will need to replace the lifting ropes as they have seen better days but that shouldn't be too much of a problem and the box top, while functional, could do with remaking – easier to do while it's off anyway.
The other couple of tasks that have been completed (nearly!) is the old cross member has been removed and the grotty plastic tubing that had been put round the bow has been stripped off. Both areas need a little cleaning up now but the worst has been done. The plywood should arrive tomorrow so I hope to be able to cut out the cross member ready for mounting and I'll give it a coat of epoxy as that was delivered this morning. It's great to think that new parts are going on to the boat rather than old stuff coming off, though there's still more of that to do as well.
One other task I have managed is to roughly draw up the rudder and stock to scale and put a grid against the drawing. I'll try to tidy that up and put it on the WWPUK group files site. I'm confident I have the stock design (plan only) about right but the blade needs a little more work. As the transom comes down at a reverse angle the front edge of the rudder needs to be at worst vertical and at the moment it's following the line of the transom which won't work too well. Should have that done today but having said that my Dad has offered me an old Finn rudder which I may be able to make work though I suspect it will need some 'adjustment'. At least its basic shape is about right and I can dream my name's Ainslie but I suspect that pumping a Potter to windward in a Force 3 – 4 is probably missing the point of the boat!
Finn sailors are of course a special breed – I recall a story about Brian Saffrey Cooper, who sailed a Finn at the Tokyo Olympics, describing a hurricane as being “Top end of 4”. The boat certainly seems to be a training ground for some of the best racers around, take a look at the hall of fame – http://www.finnclass.org/index.php?option=com_content&view=article&id=88&Itemid=14.

Friday 26 April 2013

Spring has sprung


Having bought a new tarpaulin to cover the boat and wrapped up to keep her dry I realised this morning, after the rain had been and gone, that I should have set up the mast as a ridge pole. There was a large pool in the tarp where the cockpit is – it was obvious if I'd bothered to think about it. As Homer Simpson says Doh!!!
Still at least the weather has finally improved – one week of warmer temperatures and nature is up and running. The trees have suddenly started to look greener, the cherry blossom is out and the Tulip Magnolia trees are in full bloom.
Spring has AT LAST sprung
Like most working folk the time available for doing 'projects' is somewhat limited, particularly when there are lots of other things on as well. So I have been spending the odd moments (mostly at 3 in the morning – it must be an age thing!) thinking through all the jobs that have to be done to be able to put the little Potter back in the water and make her look presentable. It's a scary list taken as a whole but hopefully by breaking it down into small tasks I can make progress – as I said in an earlier post, eating an elephant in slices.
I thought it might be interesting to put some of these onto the blog if for no other reason it will provide me with more motivation to complete them so I don't look like a complete ….. (fill the blank with your own appropriate word). I've separated them into must do and nice to do tasks to help prioritise them, though I may be tempted to do some of the latter before the former to keep my interest high.
Key tasks:
  • Replace rotten cross member and glass to centreboard case
  • Strengthen centreboard bolt mounting and put in bolt
  • Clean and paint centreboard or replace if too corroded
  • Clean and paint interior
  • Create bulkhead at front of rear locker
  • Make rudder and tiller
  • Build tabernacle and mounts
  • Make pads for shroud fixings and refit (maybe renew with good bottle screws)
  • Replace ring fixing at the bow * (see below)
  • Sort out rigging
  • Make woodwork for cabin interior
  • Connect cockpit drain to transom drain
  • etc. etc. etc.!


Pretty stuff!
  • Grind out all old filler and crazed gelcoat
  • Strengthen with glass (where needed) and refill topsides (hull seems OK)
  • Sand and prepare for paint
  • Paint topsides (I guess this is best done before putting any fittings back which may change the priorities)
  • etc. etc. etc.!
And I still have to check if the sails fit!
*One thing I am pondering (among many) is that the ring that is mounted on the bow for attaching a winch is loose. I can't access the back of it as that's within the bow buoyancy tank. I suppose I could just fill around it with epoxy putty and hope it holds but that doesn't seem very satisfactory. So what I think I'm going to do is cut a hole into the tank to give me access (and allow me to see if there are any horrors in there!) and fix it properly. Then I'll seal the hole with a removable inspection hatch. Having looked there are hatches available up to about 9” in diameter so that should do the job and maybe provide somewhere to put things out of the way.
Right - off to buy my plywood!

So I've ordered a sheet of 12mm marine ply for all the structural and exposed stuff and a sheet of 6mm WBP for everything else - should be delivered on Tuesday. Hopefully that will do the job! I've also orded a West GRP repair kit to get me started and some extra tape which I know I'll need for bonding in the cross member. That should give me enough to learn what works best for the repairs before I spend any more and waste it.

Thinking about the rudder assembly, I'm hoping that I can use the ply to build that. I may have to epoxy coat it but that shouldn't be too difficult and I'd quite like to see the lines of the laminates come through where the rudder is faired off. Mind you that will take some doing to make it look good - might end up with paint on it!


Monday 22 April 2013

London Marathon

Once every year, 35 - 40,000 hardened souls make their way to Blackheath Green in South East London at the start of a 26 1/4 mile adventure. Some will have completed it many times while for others it is a trip into the unknown. Nearly as many people volunteer to help out, at the registration and exhibition beforehand or at the event itself, handing out water around the course, providing marshalling and first aid services or in my case making sure the runners' bags that were left at the start are returned to their rightful owners.

The event is massive and hugely well organised, being part of it is greatly rewarding and a huge privilege  especially having run it some years ago. It meant an early start this morning to catch the coach, dropping off the club members who were running at Blackheath before making our way to the Mall. That gave us time for breakfast at a certain well known sandwich outlet, overlooking a sun drenched Trafalgar Square before making our way through security, heightened this year for obvious reasons, to our station for the day.


It really is a beautiful space early in the morning on a sunny day


Soon to be turned into a hotel

 The calm before the storm


Approximately 30,000 kit bags

 But what a beautiful day


Blessed by royalty - he's quite a character

The agony....
... and the ecstasy 


or maybe the sublime and ridiculous - must have chafed!

and some inspiring characters!


The crowds afterwards were amazing - lots of very pleased runners and over-attentive family and friends. Thousands running for charity - hope the money is used wisely

So after a long day, there were thousands of very happy runners and a hugely successful event. 

The effort needed to train properly to run a marathon takes many months of hard work and dedication - a little like restoring a Potter back to good condition. This week I am hoping to work on the centreboard to try and avoid having to replace it and make the cross brace to glass into the hull. I'm hoping to buy the marine ply today so I'll report on how good the Travis Perkins supplied product looks to be.

Saturday 20 April 2013

Raise the flags - the keel is out!

Probably the biggest challenge I saw with the project was sorting out the lifting keel. It appeared to be stuck solid and I wasn't sure where the problem lay, though the fact that the keel bolt was so corroded that it was impossible to put a spanner on it pointed to a problem there. So today, seeing as I had some time, I attacked the bolt with an angle grinder.

I ended up having to cut both the nut and the head of the bolt off before it would loosen up. Several whacks with a hammer and punch then what remained of the bolt shot out the starboard side of the keel box. Grabbing the end of the keel by the lifting shackle and it was clear that it was moving and lowered to the ground. Now the only task was to extract it from its home.

There was no way it would budge by hand so I tried attaching a block and tackle to give a little more leverage but to no avail. There was nothing for it she would have to be tipped onto her side and the keel extracted out of the bottom. A little brute force and ignorance along with careful placement of some carpet and she was balanced on her side and chocked in place.

Fortunately at this moment my Dad turned up and held the hull while I persuaded the keel from her home. It was clear that the corrosion was fairly advanced in places as the lower edge of the mild steel came away in large flakes. This was especially the case around the slot for the bolt as this part didn't want to release but with a bit more ignorance we managed to free it.

I suspect the rusted part may be too far gone to rescue so I'm going to investigate having a replacement made either in galvanised steel or aluminium alloy. I'll also reinforce the keel box very much like Bill Serjeant has on his C Type with some extra glass pads and washers. It is always good to avoid dissimilar metals from touching each other so a suitable plastic tube will go over the bolt.
Very corroded along the bottom and around the slot - otherwise fine!

and the remains of the bolt weren't much better

So I'm very pleased to have that job out of the way and I also took the old mast step off. I'm hoping to build a tabernacle for her so that can go into the bin or on the fire - it's the wrong size for the mast that came with her anyway.

New ply base to build along with a compression pad inside - then the tabernacle

and the compression post needs making as well

It once has a depth gauge!

 At least something fits - the drain plug screws all the way in

Next task - remove all the old wood from the cross brace and build a new one. Should be able to have that done during the week as tomorrow we're helping out at the marathon sorting out the runner's bags at the end. It's a long day, leaving the house at 6am and not returning until 7pm, but it's great to feel a part of an amazing event, though our thoughts will be for the dead and injured from the atrocities in Boston.

Wednesday 17 April 2013

Joining the dots

My trip to Screwfix was a success - the Tyvek suit, goggles and respirator mask all seem great and the bonus was I found a tarpaulin the encases the boat completely for just over £11. That's been wrapped round her but it needs a bit more rope to stop it blowing around in today's strongish breeze so I'll have to do that before close of play today (for those in the US that is an expression from a game called cricket, which can last up to 5 days and still end in a draw!).


Almost tailored for her!

My father popped round early this evening to be introduced to the new member of the family. As is mentioned in an earlier post he spent many years sailing and still follows the sport avidly - he even still subscribes to Yachts and Yachting. So I think I may have whetted his appetite again and I expect he may be around to help occasionally.

Being a day for those of us still having to earn a crust I've only managed to jump aboard for a short time this evening. However I have measured up the cross brace that needs replacing. I'm not sure if it was the correct method but I used a batten, measured and marked out 3" spaces and then measured the drop from the top of the existing (though rotten) brace at each of those marks. It was very approximate but seemed to work OK.


3" spacings marked on to batten

Then I marked out the measurements on a piece of card, joined up the dots (I knew those books I did as a kid would come in handy) and cut out a template and back to the boat to see if it would fit. A little adjustment with the scissors and I had a reasonable fit. So I'm ready to rip out the old rotton wood and cut out some ply - it looks about 9mm thick. There are quite a few bits and pieces around the boat that could do with that sort of thickness so I may invest in a sheet. Alternatively I might be able to persuade Travis Perkins to cut some to rough size for me which would be simpler to transport.


Template pre-adjustment

Looking at the existing brace, it seems it was only glassed in where it attached to the hull bottom and to the centreboard box. It doesn't seem to have been attached to the side of the hull which seems odd. I think I'll be glassing there to build more rigidity to the hull unless anyone can think of a reason not to?

Finally I've been giving more thought to the layout design in the cabin. There's about 6' 6" from the rear wall of the forward buoyancy tank to the rear wall of the cabin. So it should be possible to build a full width bunk to sit on top of the centreboard box to make a reasonable bed. the trouble is what to do with the structure when not using it - maybe some clever folding mechanism? Clearly more thinking needed.

Tuesday 16 April 2013

Work gets in the way


Definitely a work day today so there won't be much to report. One of my other 'hobbies' is helping to coach young sprint athletes at Lee Valley Athletics Centre – my contribution to volunteering and Cameron's 'Big Society' (Am I the only one who really hates political branding?). These kids are mostly from single parent families around the Tottenham, Edmonton, Enfield areas and to see them grow both as athletes and human beings is what makes the effort worthwhile. So that's what I will be doing tonight rather than scrabbling about the bottom of the boat.
However I have ordered the protective bits and pieces from Screwfix and will be picking them up later. I have to say they have a great service – order on-line and collect from the local branch – and the range of products is impressive. I would think that barring the specialist chandlery stuff they have most of the tools and equipment that anyone would need to build or restore a boat and at reasonable prices.
I've also discovered that Travis Perkins stocks allegedly marine grade ply rated to BS1088 in a variety of thicknesses from 4 to 18mm. While it may not be totally suitable for hull construction I would think it will be OK for the interior work I have to do and there's a branch a couple of hundred yards from my office. Once I've decided what I need I'll drop in there to have a look at the quality of the sheets - I would at least like the top surface to look half decent without the use of stains.
One thing that is puzzling me is along the inside of the cabin wall, either side of the cabin opening where the seats finish, there is a thin layer of glass moulding that wraps upwards. It is as if it joined on to something like a wooden panel either side of the entrance. I've just had a look on the WWP-UK group site and there are some photos there of a Nova (Molly) that looks useful with ply panels either side of the cockpit entrance – but if anyone has some better photos of these that would be very useful. In fact if anyone has any good photos from the interior of their Potters, preferably Type C, D or a Nova I'd be very grateful.

Random piece of fibreglass left unattached - any ideas?
Lastly, having a relatively blank sheet inside I'm wondering if there isn't an opportunity to design something really interesting internally. As I suspect the chances of my better half spending a night aboard are minimal then building her with a single berth might be feasible. All suggestions will be gratefully received! I even wonder if it wouldn't be possible to have a folding bunk arrangement that would sit above the keel box to make a double? Then maybe I could persuade SWMBO to join me.

Monday 15 April 2013

Delighted its not a big boat!


Another day dawns with bright blue sky and a blustery wind. Unfortunately the wonderful world of work requires me to spend half of the day sitting in traffic and the other half producing a presentation for a client. Still the mortgage has to be paid and I want to begin assembling the necessary tools for the project that I don't already have so need some readies. One tool that I have invested in is a DeWalt random orbital sander that can be attached to a vacuum cleaner. It's still sitting in its box at the moment and as work on the GRP isn't planned until after the structural stuff it can stay there. However I will report back on how well it works when I do start to use it.
Given the lack of space inside the cabin, sorting out the internal woodwork is going to be a challenge for someone 6'3” tall. It's also going to be dusty so some of my first purchases are going to be a Tyvek suit, safety goggles and a respirator. Having worked with glass fibre many years ago I know how itchy it can be, have no wish to risk breathing in the fibres and with only one good eye need to protect it! A trip to Screwfix looks on the cards (other hardware outlets are available!).
One of the challenges I've already found is that the remaining fittings on her (shroud fixing, mast step etc.) are fixed with screws and nuts, with the latter on the inside. Given that my better half has other things to do I need to find a way of securing the nuts to allow the screws to be removed. The wood that the nuts are buried in is soft so it's a tough job and I don't particularly want to resort to cutting them off.
Quick update, I've managed to undo all the screws on one shroud fixing and have removed it but there's one stubborn nut on the port side. Still, this stubborn nut will solve it one way or the other. I've also chipped away all the rotton ply that acted as a pad inside on both fixings and the mast step pad - approximately 300mm square of wooden mush. As this clearly wasn't sitting in water I assume it is the effect of years of condensation and a lack of suitable wood treatment.
At least somethings not rotten!
I've also managed to put her up onto some blocks to level her out and be able to put the car back on the drive. I certainly couldn't have done that on my own with anything much bigger. The fact that she is virtually flat underneath also makes it easy - no need to make a V-shaped chock - but I have treated her to some carpet as you can see below.
Up on blocks and vaguely level - I must invest in a better cover though

I've also taken a closer look at some of the old filling patches. I think they're all going to need removing and replacing with a little chopped strand and epoxy rather than the tatty polyester that I suspect was originally used. So that's another couple of tools on the list - a Dremel (though I may be able to use the one at work) and maybe a grinder.
How not to fill cracks in the gelcoat

Finally I have to work out how to draw up that cross member that needs replacing. There's probably enough left to be able to do a rough drawing and I think I'm going to set up a batten across the top of its remains from where I can make regular drop measurements. Then I'll be able to do a full scale drawing onto a piece of suitable ply. Once I've done that I can set about removing the rotten timber - oh joy - and set about playing with glass fibre and epoxy.

Sunday 14 April 2013

The Truth Dawns and Other Cliches

(Geordie Accent) "Day 3 in the Big Daddy household - 9.08am. Jaqueline D has spent the whole night lying on the driveway but has woken up to the first decent day in months. In the bedroom Ian is struggling into some old clothes regretting the last couple of glasses of Sauvignon he had consumed the night before at a friend's birthday party and murder mystery night."

At last a day not interspersed with pouring rain, thundering hail or drifting snow. I finally have had a chance to clear out the rubbish from inside the Potter so you could see the dog from the rabbit - and it wasn't the fluffy bunny. I think I now have a clear idea what it is going to take to be able to make her sailable and then what more will be needed to make her beautiful and live up to her forthcoming name.

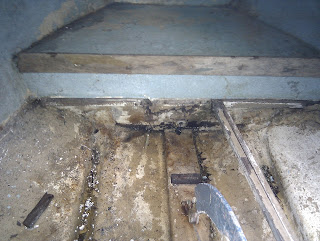
Literally all the internal woodwork is going to have to be replaced, including the cross brace in front of the keel box. Probably the only wooden structure that hadn't succumbed to rot is the mast compression post, but I haven't looked to see if it would fit properly and it has a couple of rusty fittings on it and a very dilapidated depth gauge (or at least that's what I think it was).

Rotten cross brace and very rusted keel bolt - now has a lot of WD40 on it!

But I suspect it will take some shifting - haven't tried it yet

 Almost clean up front but hasn't had fresh water standing there for umpteen years

 Not much wood left!

And the mast step is going to need replacing as well - I'm hoping to build a tabernacle

I only had an hour or so this morning as babysitting duties beckoned, well they keep you young don't they, but I hope to sneak some time this week to begin dismantling her, making sure to keep as many parts as possible for patterns. Incidentally, there are a load of polystyrene blocks in the boat - is this normal? I can understand the purpose but I didn't know if they were standard or whether they were added some time after original manufacture.

So I'm beginning to make a list of the tasks to be done in some sort of logical order which I will post shortly. This is one of those elephant moments - slice at a time. One of the things I must sort out is how to stop water leaking into the bilges. At least the cockpit drain plug is in place. I'm going to put a cover on her in the next few days which will of course help and I hope to move her off the front drive round the side of the house where I can rig up a cover to work under. It would naturally be better if I put her into the garage but I have an old Triumph Tiger (an early triple) in there and more critically the garage door is stuck closed and we're waiting to have it replaced.

I'm also making a list of what tools and equipment I'm going to need. I have access to some at work but will need a little investment. I'm happy to spend a little on this as part of my retirement plan is to take up boat-building. The skills and experience acquired on this project will go some way towards that hopefully but I'd also like to take one of the courses on offer at the International Boatbuilding Training College in Lowestoft when I have the time (and money!).

But the first task I believe is to clean up the inside of the hull and cut away the rotten cross member timber - more news soon.

Saturday 13 April 2013

Onwards and Upwards

Managed to at least apply some soapy water to her topside yesterday afternoon before the heavens opened and the cockpit started to fill up with water. I haven't had time to investigate yet but it seems the cockpit drain runs straight into the bottom of the hull rather than being connected to the outside so there's water in the bilges.

The top has severe acne. It has clearly suffered from gelcoat rot at some time but the filling has been hamfisted - and that's being kind. So I think that each repair is going to have to be eventually removed and properly reinforced and mended - but that shouldn't stop her going in the water as long as I'm not too precious about how she looks. Then I'll be able to work on each repair one at a time until they are all finished and then paint the whole boat - while still being able to sail in the meantime.

I also put the mast up just to see what needed doing to the rigging. I'm pretty convinced it's not an original mast as the forestay was too long while the shrouds seem about right. So the forestay will need to be altered - another new skill to learn!

I haven't had the chance to get inside yet - it's a bit of a mess - and I have grandchildren to look after tomorrow so probably won't happen until next weekend.

However back to the trip from Poole. I now have the pictures from the trip so have put a selection here as part of the story. The good news is that the trailer itself has not rusted through, it was the suspension strut that I suspect was an Indespension unit, which I understand is prone to the brown stuff as it has a box section that can't be accessed with any form of rust preventer. So two new struts, a pair of new bearings. some elbow grease and Hammerite and we should be good to go (told you I was an optimist!).

I understand from Dr. Dyl that it's not possible to leave messages on this blog. I'm not sure why that is as the settings are correct to allow comments so I'll have to investigate. I'll publish when I've discovered what's wrong.


Jaqueline looking a little sorry for herself

JB not convinced I know what I'm doing!
He's probably right
Ready for her new life

 
Boat and trailer with a list - bit of a problem, particularly at the end of the journey!


Trying to work out how to offload her - note strategically placed dolly

At her new home proudly watching the world go by - well at least a few cars, pedestrians and the never ending dog walkers


Friday 12 April 2013

Adventure to Poole


Having hired a car with a towbar and a suitable flatbed trailer (details below) we had an early start to avoid the worst of the traffic around the M25. There seems to be a critical time after which the journey becomes painful – I've found that if you join the motorway by about 6.15am at J24 it runs steadily round to Heathrow with only the occasional chewy moment. 15 minutes later and you can be guaranteed to be stationary several times before passing the M4 – and people drive this way every day!!!
So a successful trip down to Poole with a short diversion for breakfast in Sandbanks to see the sea and introduce my Spurs mad son to 'Arry's gaff. (For those not au fait with the arcane world of soccer, Harry Redknapp is a legendary football manager who was until recently in charge of Tottenham Hotspur FC while Sandbanks has become famous for having some of the most expensive real estate in the world, with some wonderful views across Poole Harbour and Brownsea Island.) Then off to find the boat with a small detour due to my poor navigation (Note to self – don't find yourself at a dead end with a 16ft trailer on the back!).
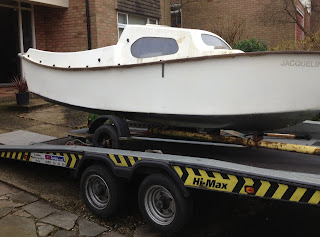
The boat was chocked up so needed to be put onto the old trailer that she came with and after we applied a little brute force and a lot of ignorance she was suitably mounted. With the flat bed tilted we managed with the help of the winch to pull her into place and with lots of strapping and ropes we had the boat and trailer fixed on and ready to go. Paperwork sorted and I was the proud owner of 64 / 64ths of a West Wight Potter Type D, named Jaqueline. As you can see from the photos, it appears to be D 11 but we have no other clue than that.
The journey back home proved to be slightly more exciting than the trip down. The first issue came when I realised the boat was no longer pointing straight forward. A quick stop involving some retightening of ropes and a new one connecting the bow with the flatbed solved that one. Another 10 miles or so and I realised that something else was not quite right – the boat seemed to be listing to the left which is not a good thing either on water or land. So another stop was called for and it became clear that the left wheel of the old trailer had become detached from the rest of the structure. The deteriorating effects of ferrous oxide had put paid to my hopes for having a very cheap road trailer. However with retightened strapping we made it back home without further incident but left with the problem of how to unload without a functioning trailer.
Luckily I had access to a wheeled dolly and with the application of a little more muscle and with the help of a previously unknown neighbour who was passing at the time (Thank you Ed – the little boat obviously engenders affection) we managed to take the boat off its trailer and put her safely onto my drive resting on a piece of carpet which is where she rests now. It is surprising how different (small) she looks on the ground rather than on a trailer.
Jaqueline looking slightly forlorn in the rain
Hopefully I'll have time to give her a good clean at the weekend and study what really needs doing quickly rather than cosmetically. There are a lot of patches of poorly applied filling on the top moulding but the hull seems to be sound. The keel is stuck so a liberal application of WD40 should free up the keel bolt and then we can see what state that is in. I'll also hopefully put the rigging up just to test it and try the sails for size – depends on the wind.
I've also been giving her name some thought – Jaqueline has no meaning for me except attached to Bisset! My mother, who died recently, was born and brought up on the coast of Pembrokeshire, arguably one of the most beautiful parts of the UK. There is a small beach just down the hill from the family home called Aberbach (Little Bay) where Mum learnt to swim and to me that seems a rather good name for a little boat. Here's a picture of the bay just to prove it's beauty credentials and I hope to visit it in it's namesake sometime soon.
Aberbach, Pembrokeshire
So the adventure starts – I hope you enjoy the photos as the project progresses and with a little luck and some elbow grease she'll be afloat by the summer (if we ever have one!).
Towbars and trailers
Not having a vehicle with a towbar is somewhat of a disadvantage when you are planning to buy a trailer sailer so borrowing or hiring one is the only quick solution. Hire companies with vehicles that have towbars are few and far between so I was lucky to find a local one on the Interweb that was something of a specialist. The company is AMT (http://amtvehiclerental.com/) and has locations in Bristol, Leeds, Livingstone and luckily Enfield. The vehicle I hired was a Rav 4 with a 2.2l turbo diesel, cost just over £70 for the day and proved to be perfect for the task.
The trailer came from GT Towing (http://www.gttowing.co.uk/) who seem to supply most of the Northern home counties and have been around for years. They have a whole range of trailers for hire as well as for sale and perhaps most importantly for those of limited means or long pockets, stock a wide range of spares including bearings, seals and greasecaps.

Tuesday 9 April 2013

Kid before Christmas!

So just two more days until I travel the 130 miles round the M25 and down the M3 to Poole to collect the Potter - and then back again. Just collecting her is costing more than I had intended spending on putting her in the water - always the optimist. As I don't (yet) have a towbar on my car I've had to hire a suitable vehicle from a local firm that seems to specialise on such things (Rav 4 - have to "brush up" on my hairdressing terms) along with a flatbed trailer. I'll review these after the trip and put up the details of the companies - I'm sure I'm not the only one who needs this sort of service when moving 'projects'.

The trailer that comes with the boat is in need of TLC like the Potter herself - certainly new bearings and a suspension strut as well as a good rub down and some rust eating paint - but that can wait until the boat is near ready.

I've managed to persuade one of my sons to come with me as I may need some muscle during the loading and unloading process. Also managed to borrow some ropes and straps from my Dad who spent a large part of my childhood sailing Enterprises, OKs and Finns before venturing further afield with a Freedom 30 and eventually an Illusion. If you haven't seen these fantastic little yachts take a look at Dylan Winter's Blog entry at Bembridge Harbour - http://www.keepturningleft.co.uk/the-journey/illusions-at-bembridge-harbour/. They deserve to have a bigger following and are certainly a great way to learn how to race keelboats.

So fingers crossed the collection goes OK and hopefully there'll be some photos on the blog in a couple of days. I'm working on the principle of the more photos the better as they may help someone.


Thursday 4 April 2013

The Start of the Journey

Over the past 2 - 3 years I have had a growing ambition to return to sailing, something I did when much younger. As part of a long term plan to enjoy a less stressful life my better half and I are also keen to have a small but comfortable second property somewhere by the sea within a couple of hours or so of our current home near Potters Bar, just north of London. The trouble is neither of us knows where that might be, so I hatched a cunning plan to acquire a trailer sailer to allow us to travel round and 'try before you buy'. Therefore by the time we are ready to begin our winding down process we should have an idea where we want to base ourselves during the warmer months to spend time on the water.

Like many a deluded dreamer I have spent countless hours / days / weeks trawling through boat sales sites, ebay and a variety of egroup sites looking for the ideal choice. I have looked at a few boats including a lovely 20' clinker built centreboarder that was very tempting but would really be better left in the water once she had taken up. 


So the choice was basically down to GRP or ply / epoxy as the chances are that the boat will spend a considerable amount of time (at least initially) on dry land. I have to say that I love the look and feel of wood and with modern construction techniques and materials I suspect that a well built ply boat will require no more looking after than a plastic one but at my budget wooden boats are generally too far gone.

The other consideration, emphasised by sage advice from the SmallSailBoatClub egroup, was how simple and quick would the boat be to launch and recover if she is only going to be sailed for a day or two at a time. Considering I wanted something with a 'lid' so that occasionally I could spend a night aboard that rather limited the choices available.

Then almost by chance I was offered a Type D West Wight Potter that had seen much better days and had spent some of its life stuck in a field. Had I seen anything larger in this state I would have run a mile but these little boats can be put into a standard garage or could sit on my drive as well as a car and I should have the time and skills to put her back into serviceable nick.

So this is the start of the journey. I collect the boat next week from Poole with the short term ambition of putting her (safely) back in the water with the minimum of time, cost and effort. Longer term I aim to return her to her previous glories through the judicious use of epoxy filler and paint as well as new sails. I'll try to keep a photo log of the process to help others or just to provide a little entertainment, no doubt at my expense.

Enjoy the ride!

To follow the adventures of one far more experienced than me who has resurrected a Type C Potter see bills-log.blogspot.com/. There are lots or great pictures and stories there.